You should be asking, how accurate is my calibration procedure?
When there is an issue with pH measurement accuracy the blame is typically laid squarely on the sensor. However, calibration procedure and execution can be equally to blame. Below you will find some helpful hints that will assure you produce a repeatable, accurate pH calibration.
Before we dig in, let’s look at some of the key components to a successful calibration procedure:
- Fresh, clean calibration standards (Buffers) and rinsing solution
- pH sensor with fast response (both pH and temperature values)
- Patience and discipline
- Calibration validation and diagnostics
- Data logging
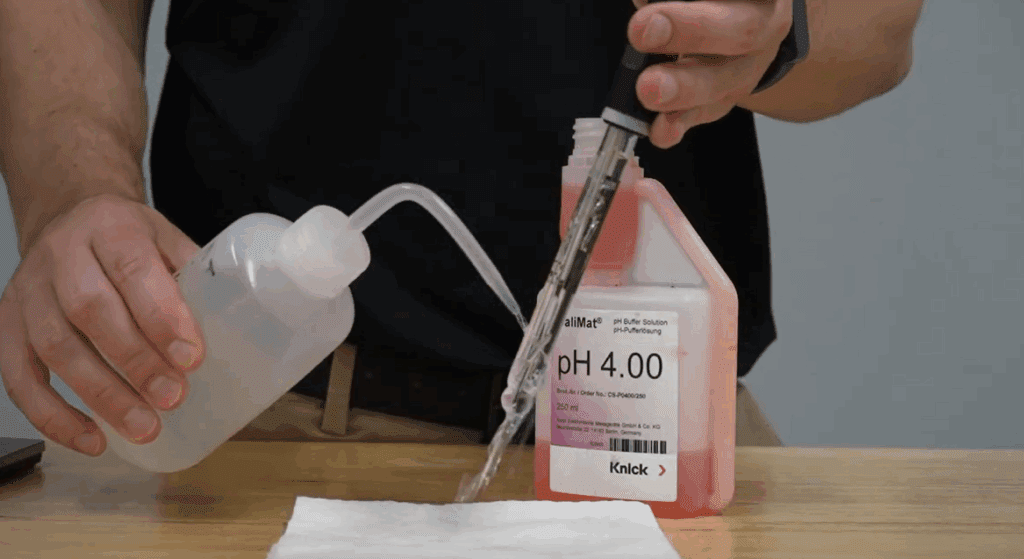
Calibration Standards (Buffers) and Rinsing Solution
If at all possible, be sure to use fresh buffers for each calibration. Buffers that have been “compromised” are a leading cause of inaccurate calibration. Compromised buffers will have a different pH value than what is written on the bottle. What causes buffers to be compromised?
- Contamination: Exposure to humid or dirty environments
- Cross-contamination: Using buffers for multiple two or three point calibrations without rinsing the sensor properly between steps
- Degradation: Buffers will degrade over time. Buffers with higher pH values will degrade at a faster rate
- Temperature: Be aware of the temperature of the buffer. The value printed on the bottle will have a temperature specification associated with it. Most buffer containers will also have a temperature chart to let you know what value you should use at what temperature.
Using a rinsing solution between steps is also a good idea. The rinsing solution should also be fresh. Low-ionic activity water is recommended; distilled water is always a good choice.
Inaccurate calibrations due to buffer handling can be minimized by using single-dose calibration bottles and a calibration device that auto-recognizes buffers and auto-compensates for the temperature of the buffer.
The pH Sensor
Not all pH sensors are the same! The pH glass recipe as well as reference system design and construction will have an impact on sensor speed of response. Slow sensors make pH calibration much more difficult.
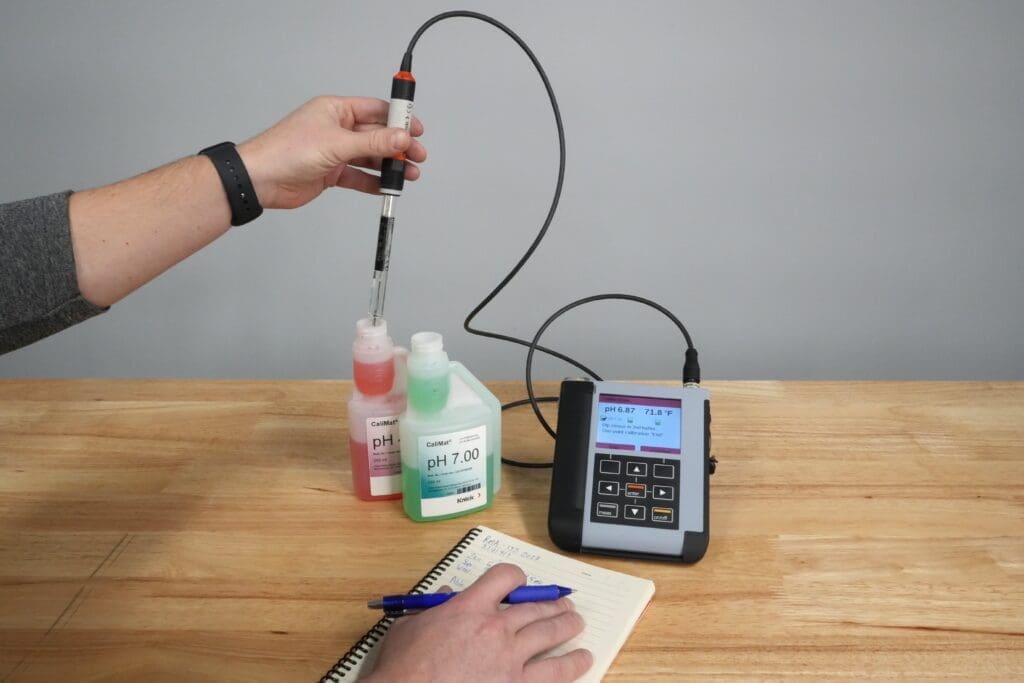
It is critical that you submerge the diaphragm (a.k.a. junction, frit) when calibrating the pH sensor. The diaphragm can be in different locations on the sensor depending on the manufacturer and design. To be safe, you should make sure to cover at least 1” of the sensor in buffer solution. Submersion of the diaphragm assures that the reference electrode inside the sensor is grounded to the fluid being measured. Without this, the sensor will not read an accurate pH and can appear to drift.
Finally, to assure saturation of the diaphragm, gently stir the buffer with the sensor. This will also speed up the calibration process.
Patience and Discipline = Accurate pH
One of the major benefits of offline calibration is that process downtime is typically not a factor. When a technician is in the field troubleshooting and calibrating a pH sensor, time is critical. This can sometimes lead to a lack of patience and inconsistent use of calibration best practices.
When doing an offline calibration, it is much easier to start with fresh, clean buffers and rinsing solution that are already at the same temperature as the pH sensor. When in a controlled environment, it’s also more likely that the sensor has been properly cleaned and inspected assuring that response time is maximized. With these factors under control, an offline calibration should take less than two minutes.
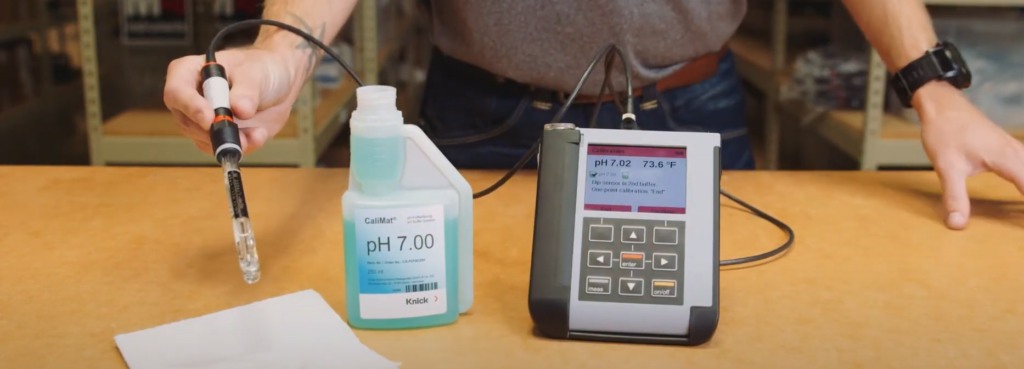
When going through the calibration procedure it’s critical that the technician allow the sensor to stabilize between steps. Always make sure to look at the calibration device (portable meter or transmitter) after putting the sensor in the first buffer. Allow for the pH value or mV value on the screen to stabilize prior to pressing the button to start the procedure. After completing the first point, repeat the process for point two (and three, if required). Put the sensor in the second solution and allow it to stabilize before pressing the button to continue the procedure. This little bit of patience will go a long way to making for a solid calibration.
If the sensor does not stabilize within 60 seconds, check to make sure the diaphragm is clean. If verified, and the slow response or drift remains, you may want to replace the sensor.
Validation and Diagnostics
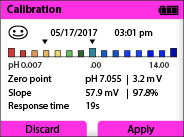
To validate whether or not you have a functional calibration you should review the slope, zero, and response time values produced by your calibration tool (portable meter or transmitter).
- A recommended useful slope value is between 80-103% (47.5 mV/pH – 61mV/pH). A slope value outside of these parameters may result in a fault signal from the calibration tool
- A recommended useful zero value is between -40mV and 40mV. A zero value outside of these parameters may result in a fault signal from the calibration tool
- An acceptable response time is somewhat subjective. If above 60 seconds, you may want to replace the sensor
There are tools available that provide a much easier way to evaluate a calibration. For instance, here is a picture of the Knick Portavo screen after a successful calibration. A smiley face means GOOD!
The Portavo portable meter also provides an evaluation of the sensor wear and electronics (Sensocheck). Here is a screenshot of the Sensor Network Diagram:
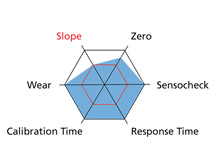
If the sensor is good for use in the field, the hexagon will remain blue. As one of the measured values begins to degrade, the blue will move in toward the smaller red hexagon in the middle. Once it hits the red, it’s either time to re-calibrate or to replace the sensor.
Data Logging
Logging calibration data can help you monitor trends over time. It can help determine the proper sensor to use in each of your applications. Also, it can help you refine and standardize calibration procedures.
Portavo logs each of your calibrations in the device as well as saves into the sensor head. Since the sensor is digital, it sends the following data to the Portavo along with slope, zero, and response time:
- Serial number
- Model number
- Manufacturer
- Tag number
- Date
- Time
Operators can export this data to a computer or tablet via a mini-USB connection and then to a CSV or Excel file. That means you would have an automated process for collecting, sorting and viewing this data.
For those wanting a more sophisticated asset management tool, Memosuite Advanced software is the right choice.
In conclusion, awareness and implementation of the key components outlined here will improve your pH calibration and, more importantly, more accurate pH sensor performance in your process.